Upload guide for qBittorrent
-
Under construction
Detailed Guide for uploading torrents using qBittorrent
This forum thread aims to offer you, a detailed guide through the entire process of uploading, beginning from the creation of the torrent file and ending with managing your torrent's page on the site.
Following the recent problems we had with the latest version of uTorrent, we were looking for a worthy alternative. Such an alternative has proven to be qBittorrent. qBittorent is a lite and free torrent client application, with a pleasant interface and intuitive controls. Its main advantage is support for all major platforms: Windows (2000/XP/Vista/7), Mac OS X, Linux, FreeBSD, OS/2 (eComStation). You can find more info and download the Windows version here and the Mac version here. Alternatively, visit qBittorent's home page (hXXp://www.qbittorrent.org/).
This guide offers 4 easy and explained steps on how to make uploading easy and correct. Follow the advice exactly and you won't have to spend your precious time correcting your mistakes and get your torrent seeded.
** Note:** The screenshots you will encounter are taken from qBittorrent v3.0.5, running on Kubuntu Linux operating system. Based on your client's version and OS's theme pack, the images may differ from yours.
-
Step 1: Preparatory work on the site
Before creating the torrent, you have to be sure your work won't be done in vain. For that, do the following:
** 1.** Do not upload banned content torrents. Thoroughly check this list!!!
** 2.** Make sure the torrent you are about to upload isn't already on the tracker!!! Consult this forum thread for tips on how to search correctly for duplicates
** 3.** Upload only one new torrent at a time in order to initially seed your upload as fast as possible. If multiple torrents are uploaded, they must be completed within 24 hours
** 4.** Consult the F.A.Q. for more details on torrent requirements. Depending on the content of the torrent, there are special rules for making torrents (like collections, images, DVDs etc.)
-
Step 2: Creating the .torrent file
** 1.** Open qBittorrent
** 2.** Go to Tools -> Torrent creator
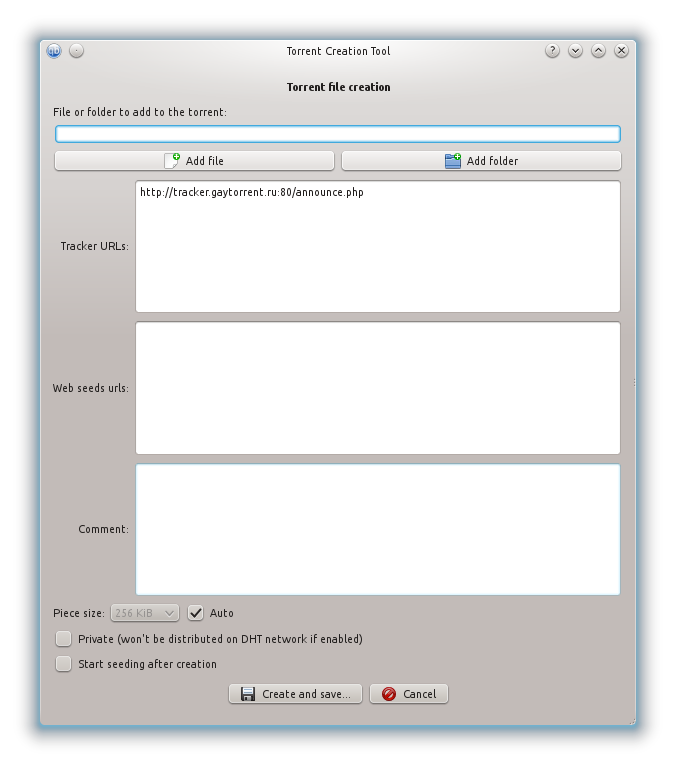
** 3.** A window will pop-up:

Be sure to have Private ticked and Start seeding after creation unticked
** 4.** Here you need to choose the source for the torrent, simply said - the files which you want to share on GT.ru through your torrent.
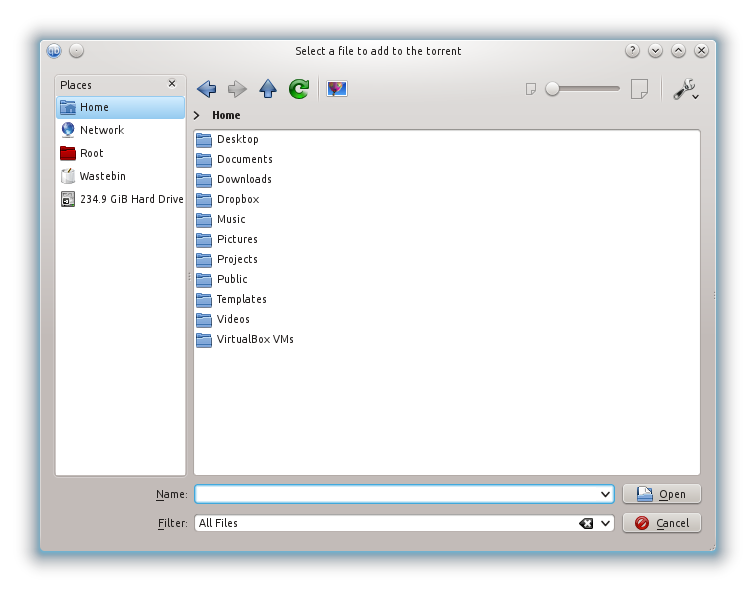
Click Add file if your torrent will contain a single file. Click Add folder if your torrent will contain more than one file and/or folders.In either of those two options, after you click the respective button, a new window will pop-up. Here, using navigation options, you need to find and select the source file or folder for the torrent:

** 5.** In the field Tracker URLs type: http://tracker.gaytorrent.ru:80/announce.php
Note: If you do not type this link now, later you will receive this error - Cannot upload. Dictionary is missing keys, and you will need to start all over again creating the torrent.
** 6.** Click Create and save…
A window will pop-up, asking you to specify the location where the .torrent file will be stored.You have now created the .torrent file, and it is safely stored on your hard disc drive.
-
Step 3: Uploading the torrent on the site
** 1.** Open gaytorrent.ru and click on Upload, the 4th button on the blue strip at the top of the page
** 2.** Take some to read carefully the information you will see in the box. After that, click I have read and understand
** 3.** In the option Select category choose a category your torrent is mostly suitable for
** 4.** In the field Pictures click Browse…, browse and select a picture for your torrent.
Torrent pictures may include a CD/DVD cover, stand-alone screenshots or a screenshot collection, sample pictures from the collection etc. The presence of at least one image is mandatory!The covers can be found on the internet easily. A good place to search is hisxpress.com or tlavideo.com. Also, you can find on the internet many application which generate screenshots from video-files. We recommend Image Grabber.
After you selected the image, click Upload.
** 5.** In the field Torrent name type the name of the torrent. It will appear as the torrent's title, visible in the main list of torrents on the site.
Please use a decent and correct title. Don't make up one when the movie already has a name. Also, be sure to add the studio name or the site the clip was taken from. If you don't know the origin of the movie/clip, please mention this in the torrent's description that will follow.
** 6.** In the field Description type a short description of the movie, video-clip collection, collection of images or books or comic-books.
Important:
-
Don't use such "highly contained" expressions like "good movie", "hot", "must see" solo. If you aren't capable or writing a description by yourself, don't be lazy and browse through the internet.
-
You can point out the technical details of the movie: play time, format, video and audio codecs used, image resolution and other.
-
In case you upload a collection of clips, point the name of the video-clips in the description.
-
If you have some additional info or personal comments on the torrent, add them to the bottom line, after the main info.
Also, here you can type a set of tags, mostly suitable for the content of your torrent. A tag is a word, or a combination of words, which indicates a much narrower category of a torrent. Tags are always preceded by a tilde ~. You need to write down the tags at the bottom of the description, in one single line, separated by a space, after the word Tags: . Here is an example of how to use correctly the tag system:
Tags: ~twinks ~bareback ~anal ~tattoo
The number of used tags is unlimited. Check this forum thread for the entire list of tags you can add to your torrent.
** 7.** In the field Torrent file click Browse…, find and select the .torrent file you created earlier and saved it on your HDD
Important: Make sure the torrent file's name doesn't contain other chars than Latin letters, numbers and spaces. If such chars exist, you need to rename the file prior to uploading.
** 8.** Click Do it!
If the upload was successful, you will be redirected automatically to your torrent's page. Examine carefully the content of the page, this is the way it will be seen by everybody who enters. If you decided to edit or change something, or add a picture, just press [Edit this torrent].
-
-
Step 4: Redownload and seed
This is the phase where most users make fatal mistakes. Do not open the .torrent file you created and add it to qBittorrent, it won't work!
If you do so, your torrent will appear as seeding in qBittorrent, but on our tracker it will be listed as inactive (or dead), and you can wait for days for your torrent to actually upload data. To explain it concisely: the torrent file you created is "virginally" clean, it doesn't contain the necessary info to link the data you want to share to your profile on the site. This is done through the passkey system, which needs to be embedded in your torrent, before it is ready to seed.
Therefore, your .torrent file needs to be redownloaded from the site. Assuming you are still on your torrent page:
** 1.** Press Download button
** 2.** The browser should ask you what to do with the file, select Save and not
OpenNote: At this point, the .torrent file you originally created is no longer of any use, you can delete it from your system.
Before proceeding, make sure your qBittorrent is not set up to autostart torrents and save them in a default directory. If that's the case, adjust the settings in a way to make qBittorrent ask you where to save the data before starting the download.
** 3.** Open the newly saved .torrent file, by default, qBittorrent will open as well
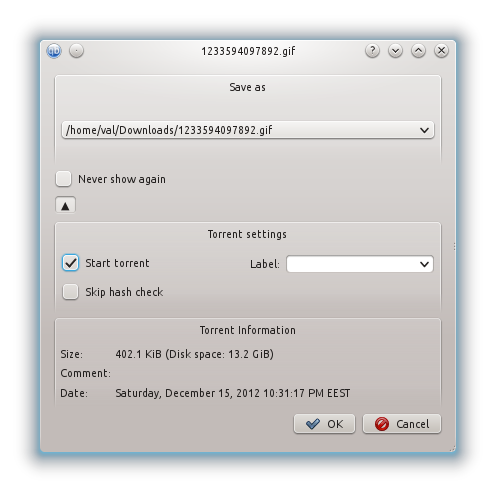
** 4.** In the popped-up window, click on the dropdown bar from the top of below image:
Note: If the "Start Torrent" box is checked, clear it before doing anything else.

** 5.** A new window will pop up. Here, using the navigation options, you need to find and select the same file or folder you used to create the torrent for in the first place:

After you found the necessary data, click ОК.
** 6.** Now watch carefully qBittorrent's main window. If the application found the correct data, you should see the scale from the column Done rising to 100%:
If this happened, you will notice an orange upward arrow next to the name of the torrent. This means the torrent went into seeding mode and it is ready. Everything is OK and you can relax.
If this didn't happen, the scale remained at 0% and the torrent started to download, which you don't want to.
** 7.** First you need to stop the torrent. In order to do that, click on the torrent, then click on Pause button from the instrument panel
** 8.** Right-click on the torrent and select Set location…
** 9.** You will see the already familiar window, where you need to specify the path to the data of the torrent
** 10.** Do a re-check of the torrent. Right-click on the torrent and select Force recheck
After that, the scale should rise to 100%. The torrent is ready for seeding.
** 11.** Finally, you need to start the torrent. In order to do that, click Resume button from the already known instrument panel
Ready! Your torrent is seeding now and it is waiting to be downloaded by other GT.ru users.
-
Step 5: Revising and patiently waiting -
….
This guide offers 5 easy and explained steps on how to make uploading easy and correct. Follow the advice exactly and you won't have to spend your precious time correcting your mistakes and waiting for days to get your torrent approved.
….should be something like " … and get your torrent seed."
geographer: edited
-
….
** 3.** Do not upload more than one new torrent at a time!!! Unless you have a moderator's exclusive permission to upload several torrents in row, you are required to stick only to one at a time …This rule has changed:
Upload only ONE NEW TORRENT AT A TIME in order to initially seed your upload as fast as possible. If multiple torrents are uploaded, they MUST be completed within 24 hours.
geographer: edited
-
…
** 1.** Open tracker.gaytorrent.ru and click on Upload, the 4th button on the blue strip at the top of the page …it is now https://www.gaytorrent.ru/
…
** 4.** In the field Pictures click Search…, browse and select a picture for your torrent. …The button is named "Browse" not search
…
** 7.** In the field Torrent file click Search…, find and select the .torrent file you created earlier and saved it on your HDD …The button is named "Browse" not search
geographer: edited, although the button caption really depends on the browser. Chrome, for example, renders it as Choose file
-
…. If you do so, your torrent will appear as seeding in qBittorrent, but on our tracker it will be listed as inactive (or dead), and you can wait for days your torrent's approval without any success or without receiving any notes from the staff. To explain it concisely: the torrent file you created is "virginally" clean, it doesn't contain the necessary info to link the data you want to share to your profile on the site. This is done through the passkey system, which needs to be embedded in your torrent, before it is ready to seed.
….should be something like "… your torrent to upload data …"
geographer: edited
-
… Now because GT.ru moderators work on a volunteer basis and their activity on the site depends on their free time, no-one can give you a precise time limit until your torrent will be approved. You can help out the moderators to speed up the approval by making sure your torrent follows all rules. Open your torrent's page again and take a closer look to adjust your possible mistakes.
Another important factor in approval is the number of allowed active torrents you can have from our site. If you uploaded a torrent, but have seeding and/or leeching a number of torrents beyond your allowed number, your torrent won't be approved until you stop all other torrents beyond that limit. In order to find out what's your allowed number of active torrents, open your profile page (click on your nickname next to "Welcome back" on the top left corner of the page). There you will notice a green number, next to Allowed Torrents. For example: your uploaded torrent always counts as 1 active torrent. If your number shows 1, that means you are allowed to have active only your uploaded torrent. If that number shows 2, you can have an additional active torrent (either seeding or leeching) and so on.
Note: When we say active torrents in your torrent client, we, of course, mean torrents from our site. The rest doesn't affect us. Still, if you want to assure a higher upload speed directed to your upload, it is advisable to stop all other torrents, regardless of their origin.
If you have completed all these requirements, all you need to do now is wait patiently until your torrent will be approved. When that happens, you will receive a personal message (PM). If your torrent is good for approval, but still requires some minor adjustments, you will be informed about this by a moderator via a PM. Read this PM thoroughly and follow the directions exactly. If you have some questions, feel free to ask back the moderator.
…This needs a major touch-up because of the torrents going live immediately and the change in allowed torrents rule. That is valid for all existing Guides written before these changes.
geographer: I think the best option is to eliminate this step completely
-
…
geographer: edited, although the button caption really depends on the browser. Chrome, for example, renders it as Choose fileHuh! :afr: Didn't know that. Need to test that with the popular browsers. Then it might even depend on the browser language?
Update:
Chrome changes that button with the browser language setting. -
Hey, geo!
An upload guide for qBittorrent is a great idea!
Well done for this excellent work!

-
Thank you Dax.
So, is it OK to be moved to Guides section?
-
It looks ready to me. But I think you should first check with Uwe.
-
Good Job!
-
I haven't created a .torrent file using qBittorrent, so I've got a question about the following pic.
Shouldn't the two boxes at the bottom (Private and Start seeding after creation) be ticked? Or it doesn't matter?

-
Start seeding must NOT be ticked, because it would start seeding the torrent before having uploaded it, i.e. with the wrong tracker URL without passkey.
As to the "Private" box, it is better to tick, so that the created torrent will have the same hash than the later re-downloaded. Changing that setting changers the hash, changing the tracker doesn't change the hash.
geographer: added
-
Thanks, Uwe!!
:hug2: -
Hey, geo!
Do I have your permission to translate the guide and post it in the Greek Board?
Naturally, due credits will be given to you for the creation of the guide.
Can I make minor modifications, such as substituting the images with images from qBittorrent for Windows?
:hug2:
Now, I have a few notes to make about the guide.From your first post:
@geographer:Its main advantage is support for all major platforms: Windows, Linux and Mac OS X.
I'd expand it a a bit, ie.:
Its main advantage is support for all major platforms: Windows (2000/XP/Vista/7), Mac OS X, Linux, FreeBSD, OS/2 (eComStation).From your first post:
@geographer:This guide offers 5 easy and explained steps
Since you abandoned Step 5, it's now 4 steps.
From Step 3:
@geographer:6. In the field Description type a short description of the movie, picture collection or musical album.
Musical albums are not allowed anymore.
From Step 4:
@geographer:4. In the popped-up window, click the button from the red rectangle from the below image:
Note: If the "Start Torrent" box is checked, clear it before doing anything else.I'm not sure which the red rectangle is.

From Step 4:
@geographer:6. Now watch carefully qBittorrent's main window. If the application found the correct data, you should see the scale from the column Done rising to 100%:
If this happened, you will notice a green upward arrow next to the name of the torrent. This means the torrent went into seeding mode and it is ready. Follow up Step 5 for further instructions.
If this didn't happen, the scale remained at 0% and the torrent started to download, which you don't want to.a) Are you sure the upward arrow is green? In my qBittorrent it appears orange.
b) Follow up Step 5 should be deleted, since there's no Step 5 anymore.From Step 4:
@geographer:11. Finally, you need to start the torrent. In order to do that, click Resume button from the already known instrument panel (green triangle)
The Resume button does not appear as a green triangle in the Windows version. It appears like this

